

This is a follow up to the microfluidics rapid prototyping post.
In this post we will:
Fix the leakage issue
Design a basic microfluidic droplet generator (video shown below)
Benchmark the performance of the droplet generator to have something to compare future improvements to
Solving the leakage issue
First let's talk about leakage.
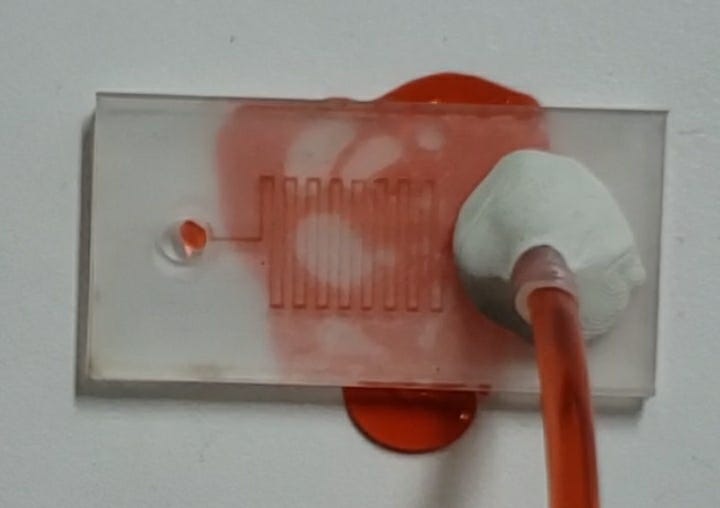
Previously, liquid would sometimes leak out from between the two layers of the circuit like shown here.
Adding a screw near each corner and using a nut to clamp down the circuit improved the sealing. I haven't seen much leakage since.

Now let's use this to make a droplet generator.
Droplet Generator Circuit Overview
If you haven't read the previous post - a droplet generator will take two fluids, eg. oil and water, and create small droplets of water inside a stream of oil. Example video shown here (credit: Churchman, Adam H. (2018) doi:10.5518/153).
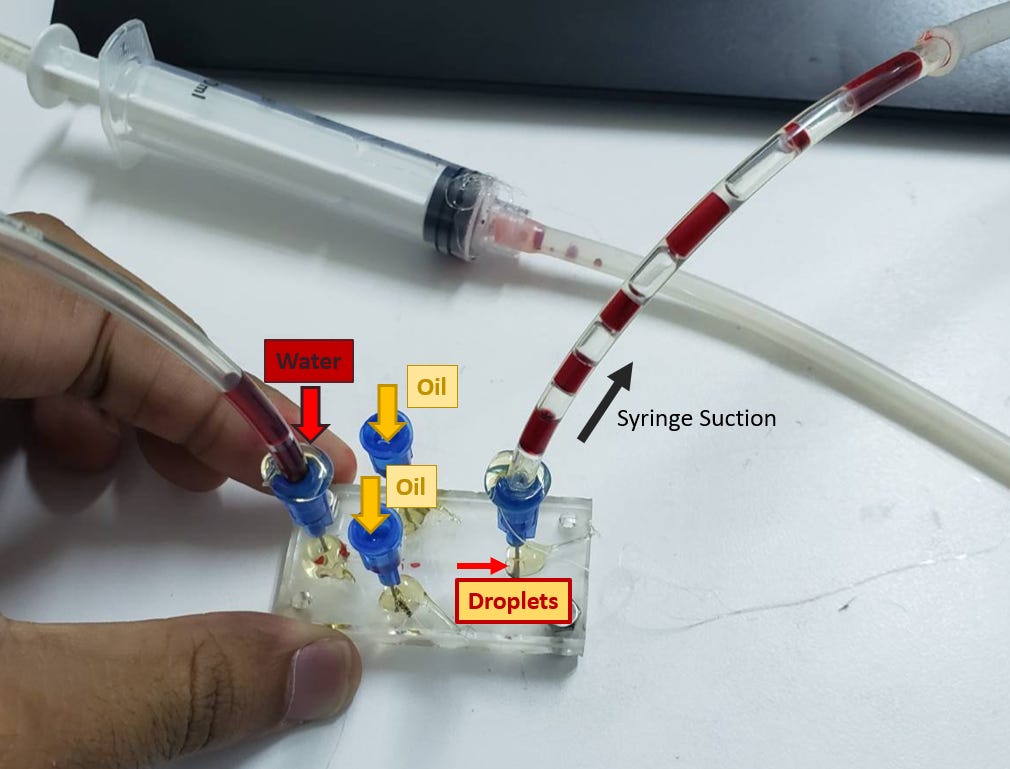
This circuit has three input ports - two are used for oil and one for colored water. We use a syringe to provide suction and pull the liquids through to the output port.

Next let's create a an internal fluid channel design that actually works. Because prototyping these is really fast, we can just come up with a basic design and iterate over it.
Channel Designs
Channel Design #1
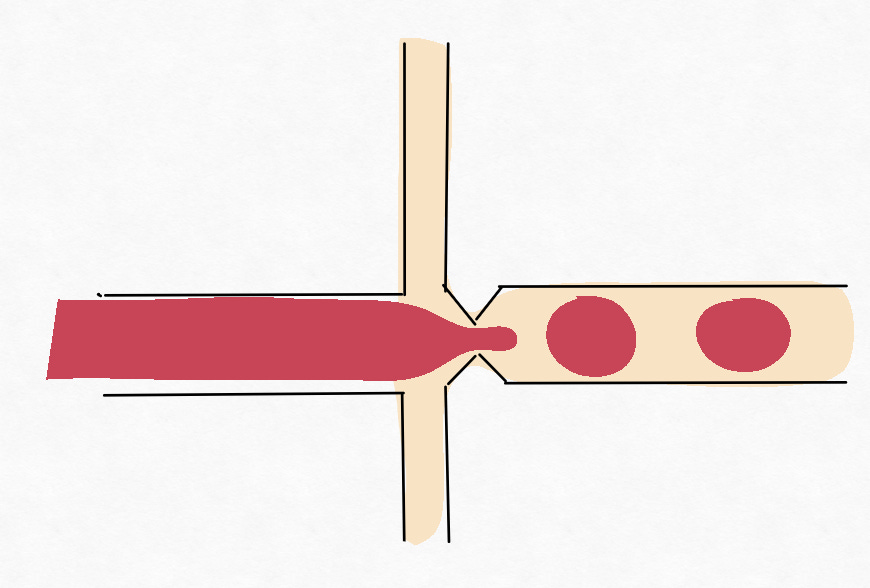
Design and Expected Behavior
The first design + how I expected it to behave is illustrated below. I expected the two streams of oil would break the free-flowing stream of red water into droplets around the constriction.
Test Outcome
In reality - the three streams just flow side-by-side.
Adding red dye to the water makes it thicker (aka more viscous). My theory is this increased viscosity makes it harder to break down into droplets.
Channel Design #2
Design and Expected Behavior
I thought increasing the flow rate of oil would force the water to break down into droplets. So I made the oil channels wider.

Test Outcome
Close - but it turns out the droplets formed before the constriction. The constriction then forced them to combine back into a larger stream of liquid.
Channel Design #3
Design and Expected Behavior
So I just removed the constriction.

Test Outcome
This made the water and 2 oil streams flow side by side.
Note: You’ll see little drops of red water coming in from the oil input ports – this is just because I was also testing whether this could generate oil droplets in a water stream and there was residual water in the oil input ports.
However it turns out if we replace water with air, this circuit can form droplets.
My theory is the oil stream still wasn't able to break the water into droplets because of the increased viscosity of water after being mixed with dye.
Channel Design #4
Design and Expected Behavior
I added a constriction before the intersection to force the water stream to break up into droplets.

Test Outcome
Which ended up working.
Performance Benchmarking
This isn't a great droplet generator because:
Droplet sizes are inconsistent
The droplets are generated quite slowly
This may be because I pull on the syringe manually. This causes the suction pressure to fluctuate - which could be responsible for the inconsistent droplet size.
But let's add some performance benchmarks anyway so that we have something to compare to in the future.
Droplet generation rate (Hz): How many droplets are formed every second?
Droplet volume (µL): How many microliters is each droplet?
Let's start with the results and then I will discuss the measurement method. After that I also talk about about three weird little artifacts you might have noticed while looking at the videos so far.
Droplet Volume
Roughly 0.05µL
1 tablespoon of water would create ~300,000 droplets

Droplet Generation Rate
Roughly 0.8Hz
It would take ~4.3 days to convert 1 tablespoon of water into 300,000 droplets

Let's talk about measurement methods.
Droplet Generation Rate
To measure droplet generation rate, we can add a red line and count the time it takes for a droplet to cross the line.
The droplet generation frequency is roughly 0.8Hz (i.e. 1 droplet formed every ~1.25 seconds)

Droplet Volume
First we need to know the size of one pixel in millimeters. We use a calibration ruler like shown below - 10mm is about 852.53 pixels.

Then we calculate the area (in mm2) of the entire region the camera sees.
(let's ignore perspective distortion to keep things simple)

Then we need to count how many pixels make up one droplet. This particular droplet occupies 1586 pixels

After measuring the depth of the channel (0.26mm), combine all the data to calculate the final volume of the droplet

Unfortunately the droplet volume isn't very consistent - many are around the ~0.06µL mark with the occasional ~0.02µL droplet.
Replacing the syringe with a more constant suction source might help improve the droplet volume consistency. Or maybe increasing the suction pressure would prevent the formation of the occasional smaller droplet.

Minor Artifacts
Three interesting artifacts were seen during the experiment.
Droplet Splitting
The smaller ~0.02µL droplet is usually formed because an additional small droplet breaks off from the main fluid stream while forming the "normal" droplet. A potential fix to this might be just increasing the suction pressure.
Air Bubble
On the final droplet generator you can see an air bubble enter the flow stream.
With the slowed down video shown below you can see the air bubble enter from between the two layers of the circuit.
Some theories:
Leakage: Maybe a nut wasn't clamped tight enough or the thermal processing had an issue which caused bonding issues between the two layers
Trapped Air: Maybe there was a residual packet of air trapped between the layers during fabrication and it was dragged into the flow stream

Flow Splitting
For channel design #2, the droplet's were merging at the constriction. However after the constriction they split into separate streams around the edges of the channel. This might be because the channel is deeper around the edges - but that needs to be confirmed through testing.
