
Spider Robot Plays the Keyboard
I wanted to make a robot that can play music. This post talks about what the robot can do so far and what issues remain.

Current state
I wanted to make a robot that can play music. This is what the robot can do so far - there's plenty of issues that need to be ironed out.
Because this is not a trivial project, it's got a long way to go before it's complete. However, given how long this post has gotten already it made sense to document the progress so far.
The goal
My goal with this project was to make a cheap robot that was capable of playing the piano.
I wanted to be able to place it anywhere and have it walk to to the piano and then play it
I definitely did not want to have a robot with 50 fingers where I just install the robot onto the piano and each finger plays one key - instead I wanted the robot to move it's arm around to play music
I wanted to the option to operate these in a swarm later (i.e. many robots coordinate to play music).
The early choices
I wanted this to be cheap enough to build a swarm later so I knew I had to minimize the number of servos and use generic/cheap drivers
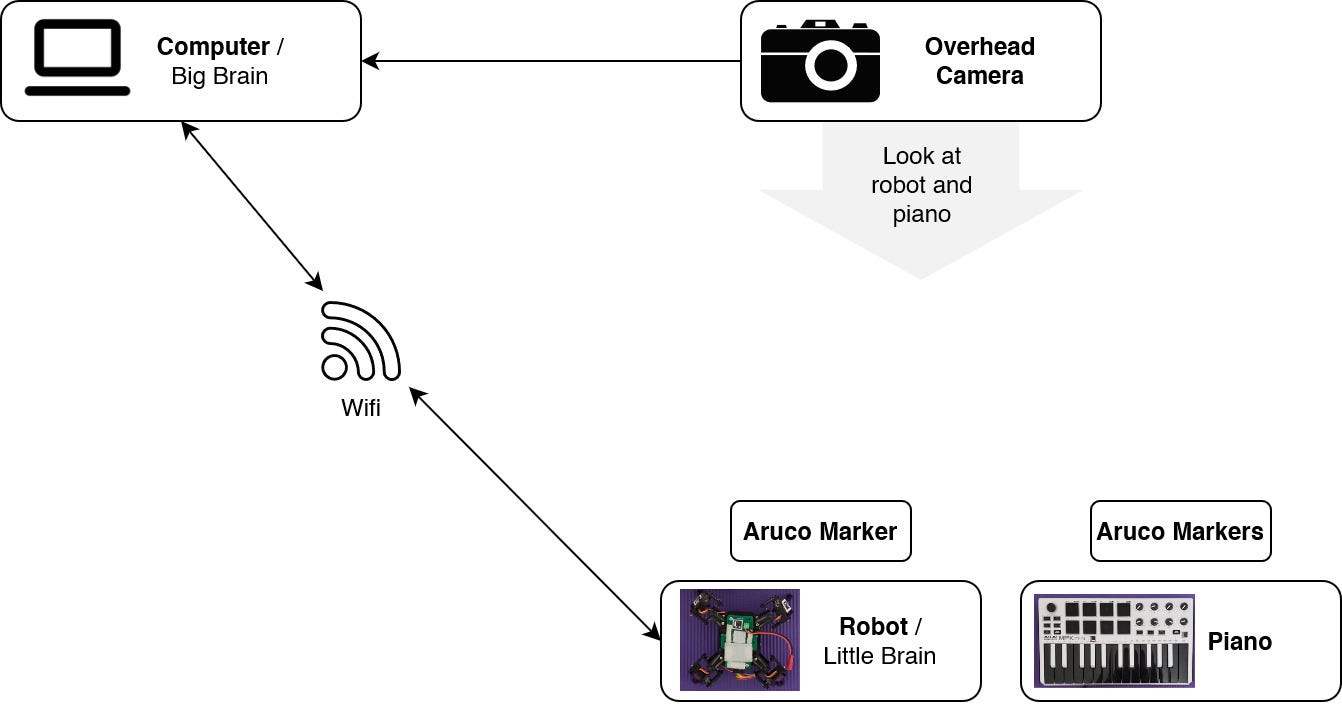
I also decided early on that there would be a "big brain + little brain" control system.
The little brain would take instructions from the big brain about when and where to move it's arms
The big brain would detect the location of the piano and the robot through an overhead camera and command to robot to move to it
The big brain would then decide what music to play (notes + rhythm) and then tell the little brain how to move it's arms to play that music
The big brain can later be extended to control multiple robots at the same time
The big brain and little brain would communicate over WiFi
This makes the two systems somewhat independent - I just need to write motion control firmware for the robot to allow it to take commands from the big brain and move it's arms around. All the knowledge about what a piano is, what it looks like, how to use it to play music, etc would reside on the big brain.
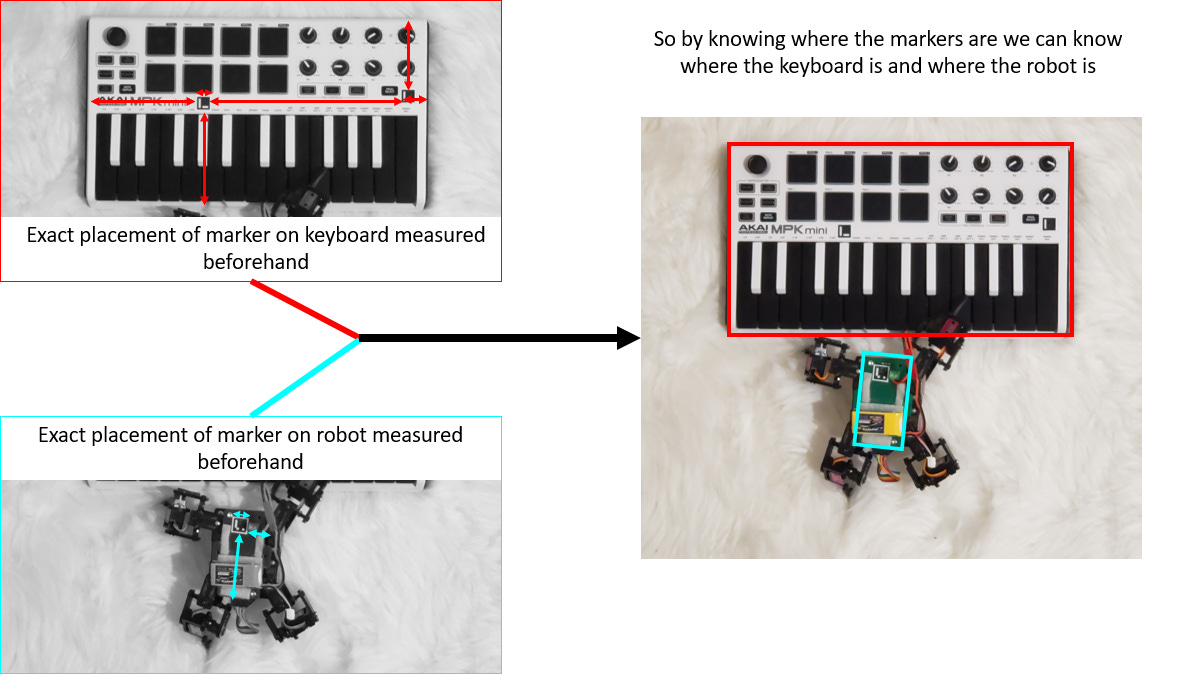
However for this to work the the big brain needs to know the position of the robot and the piano somewhat precisely. For this I used Aruco markers - I placed these QR code type labels on the robot and the piano which then allowed me to track their position.

To minimize the error in piano location, I added two codes onto the piano far apart from each other. I've only added one Aruco marker onto the robot and it seems to work fine.
The reason two QR codes is better than one is because we have a much longer distance to calibrate the camera. If we use just one 12mm large code our calibration distance is ~25 pixels but if we use two codes far apart then we get a 180pixel calibration distance and so the impact of having a one or two pixel error is much smaller.

Separately, I also wanted to have a digital simulation of the robot. I mostly wanted this for fun but it did end up being useful when I was trying to debug the motion control firmware - more on that later.

The setup
It turns out I didn't need to design a robot from scratch. There was a robot available for purchase that matched my requirements quite well - cheap, battery powered, and I could upload custom firmware for it on it’s ESP8266 controller. This means that I didn't really have too much to do mechanically apart from the fact that this robot came with incorrect and outdated documentation so I had to figure out how a bag of parts goes together to make a robot.

Camera - at the beginning I used a Logitech C270 webcam since I had one lying around. I later switched to a CMOS camera with a lens to make the position tracking more precise. The CMOS camera was pretty affordable too - about ~40USD including the lens. Neither of them are particularly high end but you can definitely see the difference in detail between the two cameras. The CMOS camera had significant lens distortion which I accounted for through camera calibration.

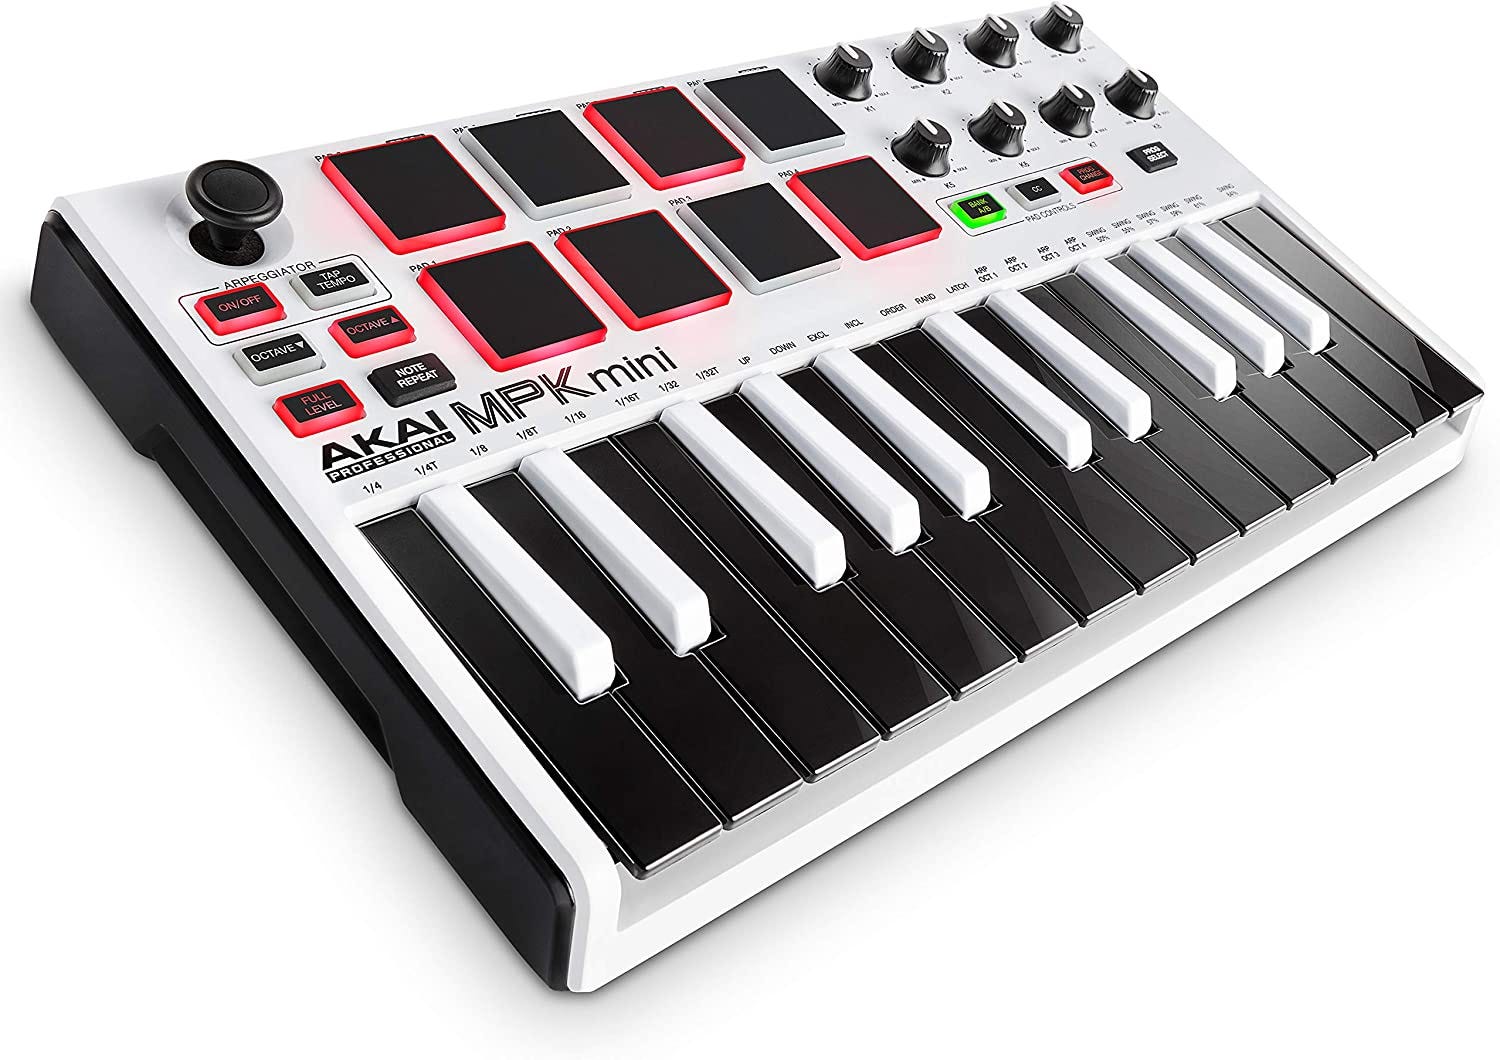
Piano - an Akai MPK Mini 2 that I had lying around.
Big brain - Python running on my computer
Connectivity - The robot and the big brain communicate over my home WiFi network.
Here’s a diagram showing how the setup works:
Robot Simulator
There are a couple options for robot simulators but I picked Webots
I set things up so that a lot of the firmware I write for the real robot can be uploaded onto the digitally simulated robot with just a few modifications, this made it pretty useful for debugging firmware issues.

One nice benefit of having a simulation was: if I ran into an issue and I wasn't sure if it was a software or hardware issue, I could just run the same code on the simulated robot. If the issue exists on the real robot and not on the simulation then the issue is probably mechanical or electrical. If the issue exists on both then it's more likely to be software related.
For example I had an issue where the path the robot followed while walking was curved rather than straight. Since I didn't see the issue on the digital simulation it seemed likely it was a physical issue. And it turned out it was - one of the legs was mis-aligned by around 10 degrees and that caused the robot to turn a little bit after each step leading to the curved path.
Robot Firmware
I ended up writing custom firmware for the robot.
It was programmed as a state machine with 7 states
Standby - do nothing
Walk forward - continuously walk forward
Turn left - continuously rotate left
Turn right - continuously rotate right
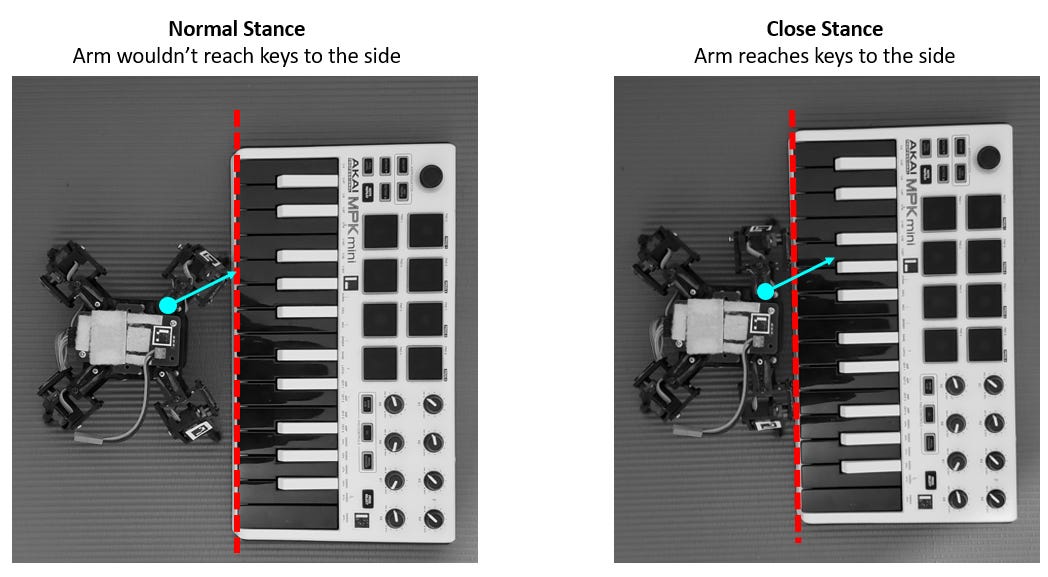
Close stance walk - this is a type of walk where it's front legs are closer to the robot chassis. This is useful because it allows the robot to get closer to the piano.
Close stance standby - same as above, front legs are closer to the robot chassis but it just stands there waiting
Music mode - I'll explain this in a minute
Close Stance vs Regular Stance
Here's an image that shows the difference between the close stance and regular stance states. The close stance allows the robot to get much closer to the piano and allows it to reach a lot more keys compared to the regular stance where it would just reach 1 to 2 keys.
Music Mode
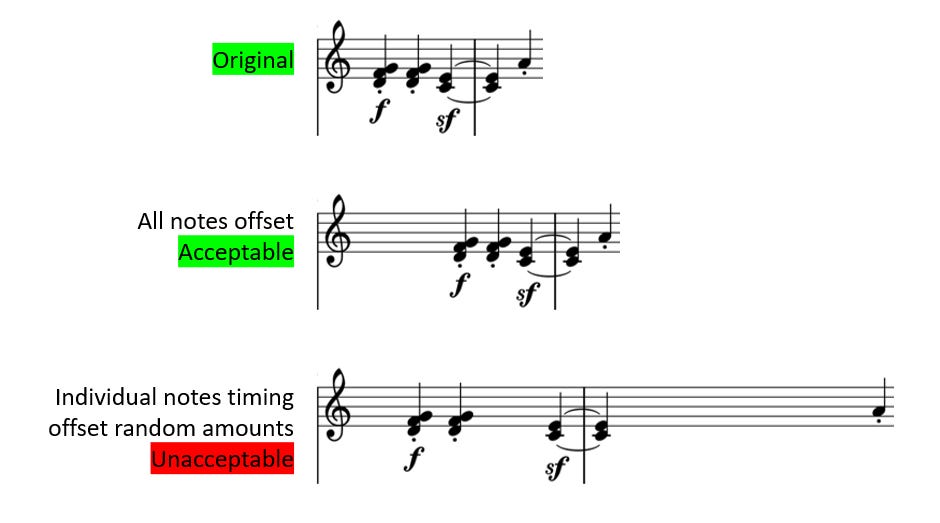
For the robot to play music, it had to have somewhat accurate timing for motion control. If there is supposed to be a 0.25 second gap between two notes that are played then the second note does actually need to be played somewhat close to 0.25 seconds after the first. But the start time of the song can be offset by as much as 5 seconds and it wouldn't be a problem.
Music mode is a way of loading up commands into the robot's queue so that it can focus on playing music "live".
The big brain will translate high level commands like "play the note C4" into about 5 to 10 more specific movements such as "lift your left hand by 30° then turn your left arm by 38°" and so on. If we try to issue these commands to the robot exactly at the time the command needs to be executed, WiFi latency + program execution latency become an issue. Both of them are variable enough that it would lead to timing issues where we can't predict exactly when the note will play even if we try and account for the latency. This means we need to queue up these commands for the robot to execute later, when the exact time comes. This means the commands the big brain actually issues to the little brain is closer to "lift your left hand by 30° in 300 milliseconds then turn your left arm by 38° in 650ms".
And that's what music mode does - commands can be queued up at any time and once the robot switches to music mode it will start executing those commands sequentially.
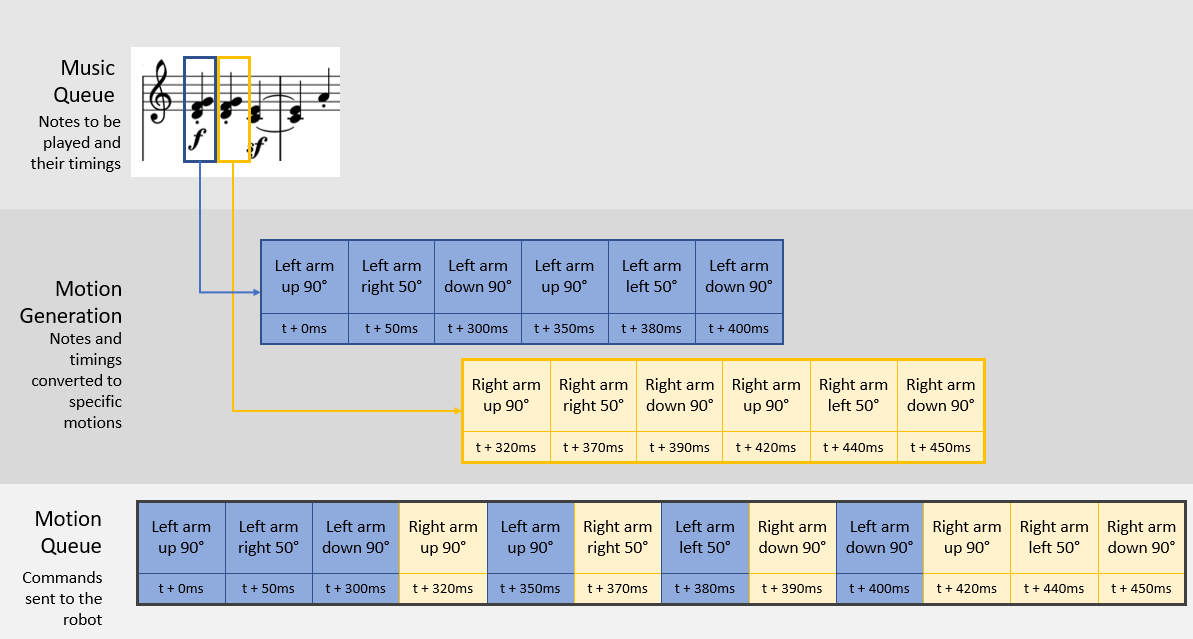
One thing to note here is both the big brain and small brain are keeping track of time. They do this by counting the number of milliseconds that have passed from the moment they get switched on. However because they won't be switched on at the exact same time their internal clocks will not be the same. This means the big brain and little brain need to sync-up about what time it is. When the big brain first connects to the little brain it asks the little brain for the time and keeps track of it. Instead of saying "lift your arm in 300ms", the big brain knows the current time according to the little brain's internal clock is, for example, 11066 milliseconds. So it sends the command "lift your arm at 11366ms". It's done this way to minimize timing errors due to latency variation.
Big Brain
The big brain has three main purposes:
It is a GUI for me to interact with the robot
It commands the robot to walk it to the piano
Once at the piano it generates some music and commands the robot to play it
Let's break the three of those down:
GUI
It is a GUI for me to interact with the robotThis one is pretty simple - I built a GUI to make it easier for me to interact with the robot. It allows me to set the robot to a specific state using buttons or allows me to issue high level commands like "GoToKeyboard" after which the big brain will start directing the robot to the keyboard.

Walk to piano
It commands the robot to walk it to the pianoThe big brain knows where the piano is because of the overhead camera.
It uses the camera to locate the two aruco codes on the piano
It also knows the dimensions of the piano and exact location of the codes stuck on to the piano.
It also knows where the robot is because of the aruco code on the robot.
It keeps tracking both the robot and piano in real time. It issues commands to the robot such as "turn left, walk straight", etc to direct the robot to the piano
There was also some optimization to increase the accuracy of keyboard and spider position tracking by filtering the noisy data
Music and Commands
Once at the piano it generates some music and instructs the robot on how to play it.It checks which keys are within reach for the robot through inverse kinematics i.e. it tries to calculate how to hit the each key and if no solution exists - it is not within reach.

It generates music to be played based on the keys that are within reach i.e. what note should be played at what time (the music it generates is extremely basic at the moment)
It converts that music into motion through inverse kinematics. For example - to play note C4 the left arm will have to be move to 30 degrees from resting position and the left finger will need to move down by 15 degrees
It does extremely basic collision avoidance eg. it knows to lift up the outer arms sufficiently before moving over the keyboard so as to not crash into it
It then streams those commands to the robot to queue them up
Current state + Issues
This is where things are at now:
Plenty of issues that need to be worked on:
It sometimes misses the keys and ends up pressing in between two keys
Potentially need to improve the inverse kinematics algorithm or improve the computer vision computations in the big-brain

It often aims for the correct key but doesn't actually trigger the key press because it either doesn't press down enough or aims too high up on a key where it needs too much force to trigger the key.
The reason for this is there is just a 1mm margin where they key press is triggered. If the arm stops above that then the note won't be triggered. However if it pushes the key below more than 1mm below the trigger point, the key will bottom out and the robot will be pushed away. This means all future key presses will be based on incorrect robot position calculations. Right now we see both these issues, sometimes it presses the key too lightly and sometimes it presses it too hard and moves the spider away a little bit. Those small position changes add up over time.

One way to resolve this might be to use a somewhat flexible end effector that can move down and bend away once it hits the bottom of the keystroke.

This would also allow me to remove the weights that are currently on the robot since they only exist to reduce how much the robot moves away after it hits the bottom of the stroke.

Another issue is the motion doesn't look natural - this doesn't really affect the functionality but small changes to the software might make it seem more natural and fluid. This could be things like:
allowing the arms to rest down when it is not going to play a note for a couple of seconds
adding slight movement of the arm between notes
All of this is going to be a lot of work to fine tune and it's probably a bit more than I should do for a blog but if I can find the time I will keep making small changes. Let's see how it plays out!